Why You’ll Love this Homemade Protein Bars Recipe
If you’re looking for a delicious and nutritious snack, you’ll love this homemade protein bars recipe. I can’t get enough of these bars because they’re packed with protein, making them perfect for post-workout fuel or a midday pick-me-up. Plus, they’re customizable; I often switch up the mix-ins based on what I’ve on hand. The combination of oats and yogurt gives them a satisfying texture, while the chocolate chips add just the right amount of sweetness. Best of all, they’re easy to make, and I can whip up a batch in no time. Trust me, you’ll want to try these!
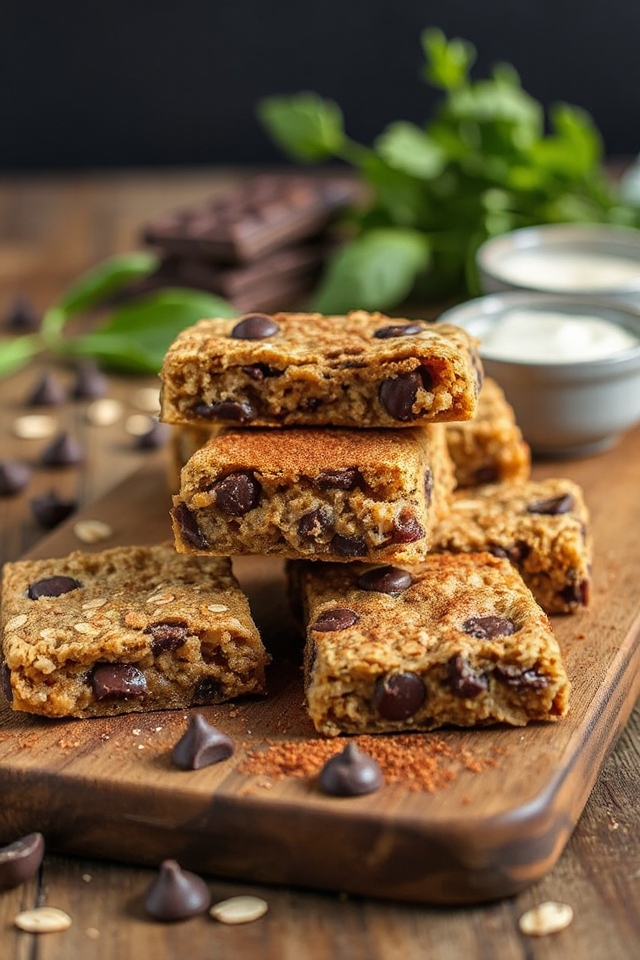
Ingredients of Homemade Protein Bars
When it comes to whipping up a batch of delicious homemade protein bars, having the right ingredients on hand can make all the difference. These bars aren’t only simple to prepare but also incredibly satisfying, thanks to the hearty mix of oats, protein, and a touch of sweetness.
Plus, you probably already have a lot of these ingredients in your pantry. So, let’s gather what we need and start creating these tasty snacks that are sure to fuel your day.
Here’s what you’ll need for the homemade protein bars:
- 1 nonstick cooking spray
- 1 cup powdered soy protein concentrate
- 1/2 cup unbleached all-purpose flour
- 2 cups rolled oats
- 1/2 cup oat bran
- 1/2 teaspoon cinnamon
- 3/4 teaspoon salt
- 1/2-2/3 cup brown sugar (packed)
- 1 cup semi-sweet chocolate chips
- 1 1/2 cups plain yogurt (or vanilla)
- 1/4 cup canola oil
- 2 teaspoons vanilla extract
Now, before you plunge into making these bars, there are a few things to reflect on about the ingredients. For instance, if you’re not a fan of soy protein, feel free to substitute it with your favorite protein powder.
Just keep in mind that the flavor and texture might vary a bit. And if you’re allergic to gluten, you can easily swap the all-purpose flour for a gluten-free alternative.
The beauty of this recipe is its flexibility; you can add nuts, seeds, or even dried fruits to the mix if you want to amp up the flavor profile.
Just remember to adjust the liquid ingredients slightly if you do. Who knew making your own protein bars could be this much fun?
How to Make Homemade Protein Bars
Making homemade protein bars isn’t only a fun kitchen project but also a rewarding way to have healthy snacks at the ready. Let’s explore the nitty-gritty of how to create these tasty treats.
First things first, preheat your oven to 350 degrees F (or 325°F if you’re using a glass pan). While that oven is warming up, grab a 9-by-13 inch baking pan and give it a light spray with nonstick cooking spray. This is essential unless you want your beautiful bars to stick like they’re auditioning for a horror movie.
In a large mixing bowl, combine 1 cup of powdered soy protein concentrate, 1/2 cup of unbleached all-purpose flour, 2 cups of rolled oats, 1/2 cup of oat bran, 1/2 teaspoon of cinnamon, and 3/4 teaspoon of salt.
Now, I don’t know about you, but I like to think of this as my “power mix.” Give it a good stir until everything is well combined. Here’s where it gets a little messy but in a good way. Crumble in 1/2 to 2/3 cup of packed brown sugar, breaking up any clumps with your fingers. It can feel a bit like a mini workout, which is always a bonus.
Then, toss in 1 cup of semi-sweet chocolate chips because, let’s be honest, chocolate makes everything better.
Now, let’s move on to the wet ingredients. In a separate bowl, mix together 1 1/2 cups of plain (or vanilla) yogurt, 1/4 cup of canola oil, and 2 teaspoons of vanilla extract until it’s all smooth and well-blended. This is where the magic happens, so don’t rush it.
Pour this wet mixture into your dry ingredients and mix it all together. It’ll be a thick batter, almost like dough, so don’t be surprised if you have to get your hands in there. Once everything is combined, spread the mixture evenly into your prepared pan.
Bake it in the center of your oven for 15 minutes, then take it out and cut it into bars of any size you fancy. Pop them back onto the baking tray and bake for another 15 minutes, or until they’re golden brown around the edges.
If you’re feeling adventurous and want extra crunchy bars, turn off the oven and leave them inside for up to 45 minutes longer. Cool them on a rack, and voilà, you’ve got yourself some delicious homemade protein bars, ready to fuel your day!
Homemade Protein Bars Substitutions & Variations
While I love the classic recipe for homemade protein bars, experimenting with substitutions and variations can make the process even more enjoyable.
For instance, I often swap the semi-sweet chocolate chips for dark chocolate for a richer flavor. If I’m looking for a nutty twist, I add almond butter instead of canola oil.
I’ve also tried using different protein powders, like whey or pea protein, and they work just as well. For sweetness, honey or maple syrup can replace brown sugar.
Don’t hesitate to mix in dried fruits, nuts, or seeds for added texture and nutrition!
What to Serve with Homemade Protein Bars
After experimenting with various substitutions and variations for my homemade protein bars, I’ve found that pairing them with the right accompaniments can elevate the experience.
I love serving them alongside a dollop of Greek yogurt for added creaminess or fresh fruit like banana slices or berries for a burst of flavor.
Sometimes, I’ll enjoy them with a warm cup of herbal tea or coffee, which complements their sweetness perfectly.
For a quick snack, a handful of nuts or seeds rounds out the meal nicely.
These pairings make my homemade protein bars not just a snack, but a satisfying treat!
Additional Tips & Notes
To guarantee your homemade protein bars turn out perfectly every time, I recommend measuring your ingredients precisely and not skipping the step of mixing the dry ingredients thoroughly before adding the wet ones.
If you want to customize your bars, feel free to swap in different nuts or dried fruits. For extra sweetness, consider adding a bit of honey or maple syrup.
After baking, let the bars cool completely before cutting; this helps them hold together better. If you prefer a chewier texture, don’t bake them for too long.
Enjoy experimenting with flavors to find your perfect combination!