Why You’ll Love this Chocolate Protein Bar Recipe
If you’re looking for a delicious and nutritious snack that satisfies your chocolate cravings, you’ll love this chocolate protein bar recipe. I can’t get enough of these bars!
They’re not only packed with protein, but they also have a rich chocolate flavor that keeps me coming back for more. What’s great is that I can whip them up quickly, making them perfect for those busy days when I need a grab-and-go option.
Plus, they’re healthier than store-bought bars, so I feel good about indulging. Trust me, once you try them, you’ll want to keep a batch on hand at all times!
Ingredients of Chocolate Protein Bar
When it comes to whipping up a batch of chocolate protein bars, the ingredients are key. You want to make sure you have everything you need lined up before diving in. It’s a pretty straightforward list, which is great because we all know how chaotic things can get in the kitchen.
Plus, the best part? Most of these ingredients are staples, or at least easily found at your local grocery store. So, let’s take a look at what you’ll need to create these delicious bars that will have you feeling great about your snack choices.
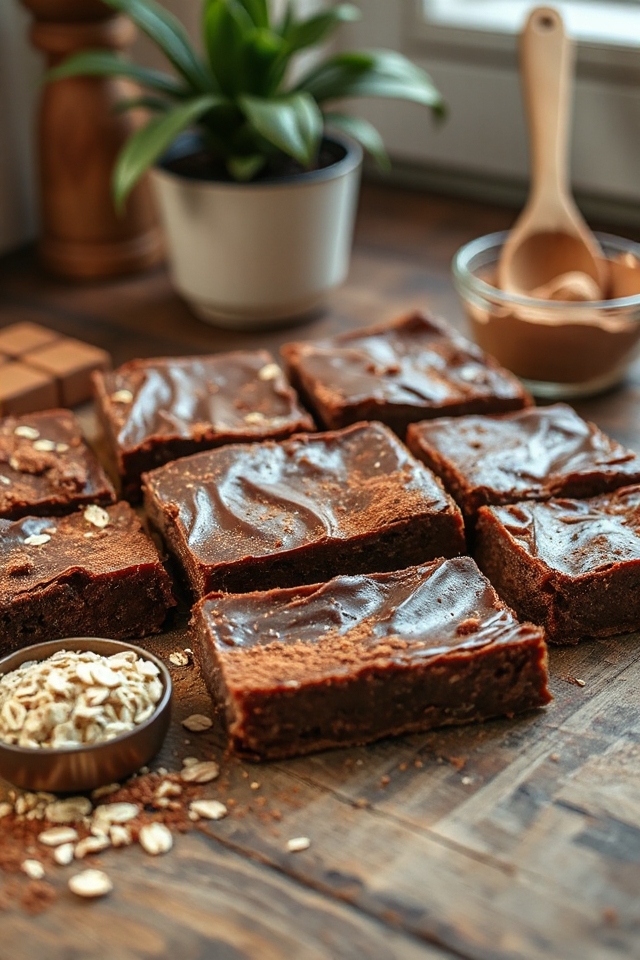
Ingredients for Chocolate Protein Bar:
- 1 cup oat flour
- 2 scoops vanilla whey protein (Body Fortress is a solid choice)
- 6 teaspoons unsweetened cocoa powder
- 1/2 teaspoon baking soda
- 1/4 teaspoon salt
- 2 eggs
- 1 egg white
- 1/2 cup stevia (in the raw)
- 8 ounces pureed pattypan squash (or another squash of your liking)
- 2 ounces water
Now, before you rush off to gather these ingredients, let’s chat a bit about a few considerations. First off, the oat flour is a great base for these bars, but if you happen to be gluten-sensitive, double-check that it’s certified gluten-free.
And the protein powder? It’s a game-changer, not just for the protein boost but for that delightful vanilla flavor that pairs perfectly with the chocolate. If you don’t have pattypan squash on hand, don’t panic. Any other squash will work just fine, so feel free to get creative.
Just remember, you want that puree to be smooth to keep the texture right. So, if you’re like me and tend to get a little messy in the kitchen, grab a blender or food processor for that squash. Trust me, it’s worth it to save yourself from a sticky situation later on. Happy baking!
How to Make Chocolate Protein Bar
Making your very own Chocolate Protein Bars is a delightful adventure, and trust me, it’s much easier than it sounds. To start, you’ll want to preheat your oven to 350 degrees. This is essential because no one enjoys waiting around for the oven to heat up when they’re ready to plunge into some delicious homemade snacks.
While that’s warming up, grab a large mixing bowl and combine 1 cup of oat flour, 2 scoops of vanilla whey protein (I’m a fan of Body Fortress, but use what you like), 6 teaspoons of unsweetened cocoa powder, 1/2 teaspoon of baking soda, and 1/4 teaspoon of salt. Give those dry ingredients a good mix. You want everything to blend together like old friends at a reunion—smooth and happy.
Now, let’s shift gears and mix the wet ingredients. In another bowl, crack open those 2 eggs and 1 egg white, adding them to the mix. Then, sweeten things up with 1/2 cup of stevia (in the raw). If you’re feeling a little adventurous, you can add 8 ounces of pureed pattypan squash, which not only adds moisture but also some sneaky nutrition.
And if your mixture seems a bit thick, don’t fret—just splash in 2 ounces of water to loosen it up a bit. Once you’ve got your wet ingredients all blended together, it’s time to unite the two bowls. Pour the wet mixture into the dry and stir until everything is combined. You want it to be homogeneous but not a total workout for your arm—just enough mixing to get rid of those pesky dry pockets.
Next, you’ll need to prepare your baking dish. Grab an 8×8 glass Pyrex dish and spray it with non-stick butter spray. That will help guarantee your bars don’t stick like a clingy ex. Pour the batter into your prepared dish, spreading it out evenly.
Now comes the best part—bake it in your preheated oven for 20 to 30 minutes. It’s like waiting for a surprise party; you know something good is coming, but you have to be patient. Once it’s done, let those bars cool for a bit before cutting them into 8 bars.
And there you have it, your very own homemade Chocolate Protein Bars. Enjoy them guilt-free, knowing you made them from scratch!
Chocolate Protein Bar Substitutions & Variations
While I love the classic Chocolate Protein Bar recipe, experimenting with substitutions and variations can elevate your snack game even further.
For a nut-free option, I often swap oat flour with coconut flour. If I’m looking for extra crunch, I add chopped nuts or seeds.
You can replace stevia with honey or maple syrup for a natural sweetness. I sometimes mix in protein powder flavors like chocolate or peanut butter for a twist.
If I’m feeling adventurous, I incorporate dried fruits or dark chocolate chips for added flavor.
The possibilities are endless, and I enjoy discovering new favorites!
What to Serve with Chocolate Protein Bar
What can I pair with my delicious Chocolate Protein Bar to enhance my snack experience?
I love enjoying it with a side of fresh fruit, like sliced strawberries or banana, which adds a rejuvenating touch. A small dollop of Greek yogurt complements the bar beautifully, offering creaminess and extra protein.
If I crave something crunchy, I’ll grab a handful of almonds or walnuts. For a cozy drink, I often brew a cup of herbal tea or a rich hot cocoa, making it a truly satisfying treat.
These simple additions elevate my snack time and keep me feeling energized!
Additional Tips & Notes
Pairing your Chocolate Protein Bar with fresh fruit or nuts can enhance your snack experience, but there are also some handy tips to keep in mind when making these bars.
First, if you want a chewier texture, consider adding a tablespoon of nut butter into the mix. If you prefer a sweeter taste, adjust the stevia to your liking.
Don’t forget to let the bars cool completely before cutting; this helps them hold their shape better.
Finally, store any leftovers in an airtight container for up to a week. Enjoy your delicious, homemade protein bars!